Showing posts with label completed. Show all posts

Thursday, May 17, 2012

a new strolling bag...

After making all of those little project bags, I decided to make a carry all for my daily walks with the kids. I'm branching out! I wanted it to hold my wallet, some tissues, wipes, snacks, water, library books...the kind of stuff we always need while out and about and at the park.

I decided to do this on a Sunday afternoon while Asa was out for a long bike ride. I did a "google" for a pattern for a tote bag. I decided on one with two handles, a snap closure and some pleats. You can find the pattern here if you'd like to give it a go. This particular pattern had some directions to add a pocket. But, I improvised and made up my own pocket, sewing a doubled over piece of fabric with some bias tape from the outer material to create the top of the pocket, onto the lining of the bag.

I headed to the fabric store to pick up some materials and came home and got down to sewing. It took about 2 hours, from start to finish and I came up with this!
my new stroller bag...

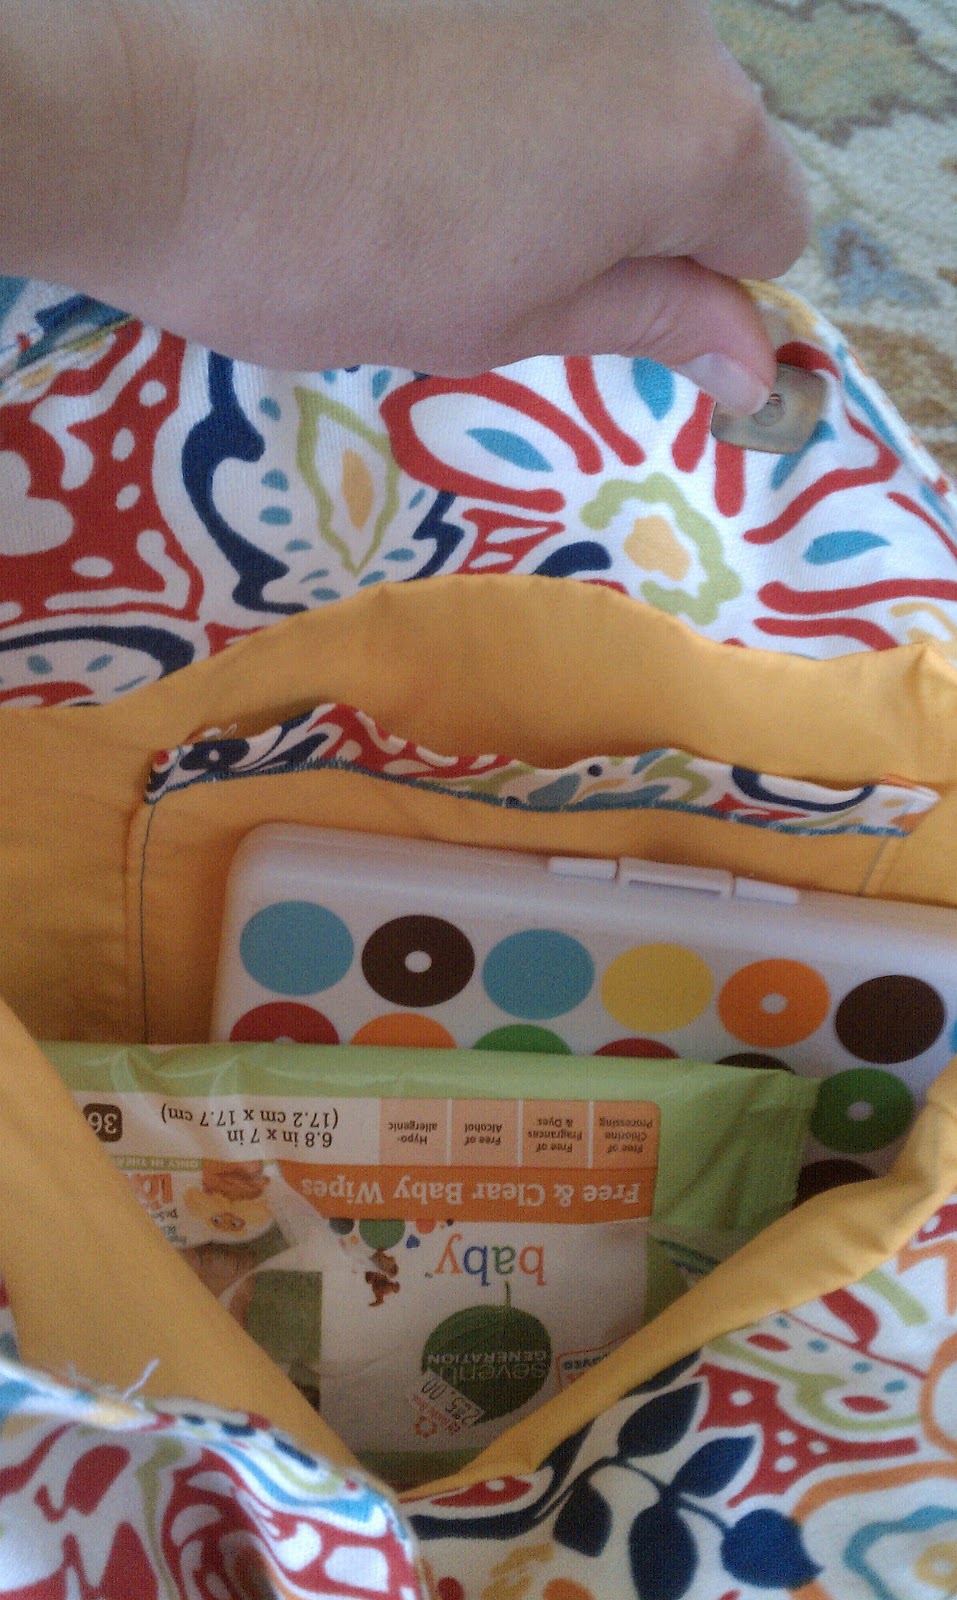
bright yellow lining to help me spot things inside...

a pocket to hold my phone and maybe some sunscreen...
The bag is working out great. I only used a light interfacing inside so its flexible/floppy enough to be mangled into the bottom stow away compartment of the stroller. The magnetic snap keeps things from falling out while on the go. And its a bright sunny print which makes me happy to carry it!  I also made a small pleated coin purse to throw in there too- but I have to admit I haven't used that once because I don't really want to start keeping two wallets...one is enough to manage.

Tuesday, April 24, 2012

handmade flannel receiving blanket

On Friday night I wanted to work on something quick for the evening. Sometimes when I have an "epic" project or two going, I like to put them aside to make something that I can start and finish in one day or evening. I have three long term projects going on right now...none of them getting very close to completion.

Enter my list of craft links (projects I love and want to revisit and attempt). I found one quick project that I happened to have all of the materials (with a substitution or two) to attempt.  If you haven't spent any time on The Purl Bee site, you need to head over there right now and see the beautiful tutorials and patterns they provide- for FREE! (I'll wait right here for you...) I can spend a whole hours clicking through all of their patterns in sewing, crocheting and knitting.

Here's what I made, using this pattern for inspiration!


I got a piece out my flannel bundle, ironed it, squared it, and pressed the fabric to hem it all the way around. I had some really nice merino wool on hand, but it was too thick to do the crochet border. Instead, I did a blanket stitch all the way around.  This project took less than two hours, start to finish. I now have a nice receiving blanket on hand, for any future baby girl birth. (which is seeming unlikely since all of the expecting mothers in my life that have found out the sex are having boys...there's still one unknown out there- perhaps this one will be the girl). If you can sew a "straight line" and do a blanket stitch, this project is for you.  And here's a blanket stitch tutorial that seems very useful (no lame music- just text and photos.)

All you need to do it is some yarn and some flannel. You could even recycle some old flannel sheets to make a set of receiving blankets for the little bit in your life!


Monday, April 23, 2012

an evening of sewing...

This weekend I got a lot of crafting done. It helped that all sewing notions and some fabric was 50% off at JoAnn's last week.

I read a super awesome tutorial recently about making a camera bag out of an old purse or bag on hand. Asa got a new camera a few months ago. Then I got him a photography class for his birthday this month. I wanted him to have a cool camera bag, instead of the felted knitting project bag that he's been using.  Since we couldn't find the perfect bag that didn't cost a ton, I started going through our closets to find a bag that would be the right size and not too girly for Asa to carry his camera in. And then I found Asa's old school bag, one that he very rarely used and was about the right size for my plan. Also, because this camera bag is just a foam pouch that is inserted into his bag, he can remove the insert if he wants to use the bag for another purpose.
The bag BEFORE
Ashley over at Make It and Love It has several cool sewing project tutorials on her blog. She sews for herself, her children, her home and for gifts and her tutorials are chock full of easy to follow directions and amazing photos that show me just what I need to do.

Asa's bag is an old Isreali Paratrooper bag, so we wanted to find a fabric suited (and not girly) for the bag. We found many fabrics that were cool and fit with the paratrooper idea, but they were all really dark, and I wanted to be sure to have a light colored fabric so Asa could see what he was doing inside the insert.
This insert took under three hours to make and since they were having a sale at JoAnn's, I got the foam, this particular fabric, thread and velcro all 50% off and came in at around $10.00.  I even have enough foam to make one more of these custom camera bag inserts and enough left over material to make pouches for Asa's camera gear that needs protecting.
The completed insert

Brand new camera bag!

Saturday, March 24, 2012

little cloth bags...

I have been a member of a craft group in my neighborhood for a few months now. I found these gals on Meetup and have had a great time meeting with them for knitting and sewing nights.  When I first started going to the She's Crafty Knit Nights, I would pull my work out of its handy clear plastic zipper bag, while some of my knitting pals would pull out some beautifully hand made fabric project bags. I was immediately jealous, and a bit intimidated. Not by their knitting skills (I was in awe of that), and not because they had the bags, but I did want to make one or two for myself and I had never sewn a zipper in my life...was I up to the challenge? I really felt that zipper sewing was "the next level" of sewing. I also was pretty much unaware of the existence of interfacing. What was I getting myself into?

I did a search for pattens for box bags and settled on a great tutorial for a project. I picked up a couple of fat quarters and a zipper and I got busy. Then I went out and bought some more zippers and more fat quarters and some interfacing...I'm nearly an expert now! These make great gifts for the other crafters in my life!
a couple of boxy bags and a pyramid and large folder

I've been spending much more time reading about crafts lately, too. I really enjoy seeing what others are up to!

Some dear friends of mine in Seattle spend time together for crafting pretty regularly (why do I have to live so far from them?). Anyway, they blog about it, here.  In a recent blog post, Sadie wrote about Click it Bags. I've been wanting to learn how to make one, since seeing my sister use the one that I got her at the Fremont Sunday Market when we were all at my dad's house recently. After exchanging a few Facebook comments with Sadie, I got myself hooked up with the pattern and the secret ingredient to these click it bags- the "click-it! closure"  The real deal can be found on Etsy doing a quick search for "flex frames," but the Seattle Crafty Girls Gone Mild are a recycly bunch, so they use portions of  measuring tapes to get the proper "click" in the bags. I whipped a couple of these up the other night, and I'm loving them! I think a few of my friends can expect one or two of these to come their way!

scrappy click it bags

Thursday, March 22, 2012

where have I been...

too busy crafting to blog...
I wish I had a good excuse for where I've been...but I don't. I just haven't been writing much. I've been crafting up a storm lately and just haven't taken the time to post. I've been reading a ton of craft blogs and trying out some new ideas...but I haven't written about any of them either. I've been checking many knitting and sewing books out of the library and working on projects from them, but like I said...lots of craftiness, zero blogging.  I'm sorry, I've been bad. (there, that's done with)

I will tell you about some of my recent finished projects, by way of apology for my long absence!

I've been using my old hand me down sewing machine a lot lately and have made some flannel pajama pants, just in time for the 80 degree weather. I've also made a couple of faux pillow case dresses, which are much more seasonable.  The pattern can be found in the book, Small Stash Sewing, which I checked out of the library. The book has some very cute ideas and since its intended for use with fat quarters, you don't need too much laying around your fabric stash to make the projects. Grace's dress is made with left over table toppers from my Vermont Wedding.  It turns out I don't actually need 6 table topper squares of purple paisley in my real married life.
my first faux pillow case dress

Grace's new dress
I've finished one of my mega projects, a baby blanket inspired by the Hudson Bay Blankets from long ago. I used a pattern found here for the inspiration and I almost followed the whole pattern too. I didn't use the suggested yarn, instead opting for an acrylic that would be soft against baby's skin (it was a lot cheaper too). Because I used a different yarn, my gauge was way off, but I thought it didn't really matter since I was only knitting a rectangle.  I knew ahead of time that I would get a larger than crib-width blanket. I thought that would make it extra snuggly for a bigger kid too, however the blanket seemed to take forever to knit. I happen to have a short attention span for knitting and start cruising Ravelry for my next project when I reach the half way point of any project I'm working on.  I love getting onto that next project...but I stuck with this blanket, determined to finish it before baby's June arrival, and keeping in mind that I had 6 other newborn's to craft for before their May, June and July births. Its in the mail now!
Hudson Bay Inspired Blanket for baby Belgrade

...with a matching baby hat!

I've also been working on some knitting project bags. Photos of those o

Friday, November 11, 2011

cozy coffee & tea...

I love my days off. I have three of them in a row each week. Friday is my Saturday... It's a day I can get chores done, appointments done, and I can usually set aside some time to relax with my knitting or crocheting.  On this "Friday acting like a Saturday" I decided to take a break from my holiday knitting and my long term epic projects. I wanted to make something today that I could start, finish and use all in the same day.  And I found the perfect project when Asa made a pot of delicious hot Thai Tea and commented on how fast he needed to drink it in order to enjoy it hot.  We needed a Plunger Pot Cozy and we needed it FAST!
cozy Thai tea

I looked online and was able to find several free patterns for a plunger pot cozy. After checking out several, I found one that I could modify to accommodate the supplies I had on hand.  I changed the number of stitches in the existing pattern because I decided to knit mine with two strands of yarn to make it thicker, hoping it will keep our tea and coffee warmer, longer.  Because I used two strands of yarn, I also used much bigger needles for the project, meaning I had to reduce the number of stitches. I kept the basic idea of three buttons to secure the cozy in place on the pot.

buttons hold this cozy on the pot

Tuesday, November 1, 2011

a chain reaction...

I got this skein of yarn for free at J.P. Knit & Stitch when they were having their Go Green! Weekend. It was a 'free with purchase' sort of deal where I got to select one skein of yarn out of a huge bag of beautiful bright yarns.  I picked this purple flecked yarn thinking it would make a beautiful hat, even if it was just a boring stockinette stitch job.  But then I taught myself how to cable and thought this yarn was up to the task of holding up lots of cables. 

If you'd like to give this hat a go, here's the pattern!

This cozy little head warmer is for Barb, the neighbor and dog walker at Grace's house.  She's so sweet...I wanted to make her something handmade for her birthday and to thank her for being the only adult I talk to sometimes during my 10.5 hour shift.


one skein wonder...

Not too long ago I was invited to try out Crafsty's new workshop feature for free. This was Craftsy's version of a knit along, with the project directions provided along with great photos and a message board feature. Normally one would have to pay for a workshop, but since Craftsy offered it for free this one time, I decided to try it out.  This particular workshop was for a knit shrug that promises to use only one skein of yarn, so I knew it wasn't going to be much of an investment of my time or money. Its tiny, but cute and it was very easy to make. It only involved knitting, purling, and increasing.


Here are a couple of photos of the shrug, but none of me wearing it...the cuffs are too tight for my big ole arms!  I did change the pattern slightly in that I used a contrasting yarn for the ribbing at the cuffs and neck and back.  It was a quick project and it the directions were very easy to follow. I plan to make another one soon, but will use a bigger needle on the arm cuffs so they will fit better (the pattern called for changing needle sizes but I'll just use the same one as for the body).

For now, I'm taking names of thin armed friends who might like to try this on for size!

cable ready...

This weekend I was trying to use some beautiful merino wool that I got on sale to make the Peace Street Hat from the Interweave Knits Holiday Magazine.  This beautiful hat made the cover of the issue!

I am terrible at following grid patterns...I can follow written directions pretty well, but once they are put into a grid, I loose it completely. I can never remember what the symbols mean from one row to the next. This means that I have to do a ton of double checking which takes forever.  I can never tell if I'm supposed to reverse the grid for wrong side or not... It does not make for relaxing knitting!

So, I scrapped my messy and mistake riddled band portion of the hat and decided to try to teach myself how to create a cable stitch band instead.  I could still use the buttons, but I would use a much simpler pattern that still had some eye catching texture.  After the band was complete I was able to pick up stitches along the edge and knit the top of the hat just like the pattern for the Peace Street Hat.


The hat came out beautiful! I am tempted to keep it for myself and find a cable knit mitten pattern to make some matching mittens to go with!

Monday, October 24, 2011

picking up stitches...

Here's a super cute sweater vest that I made for my nephew, Jonah. He is always dressed in layers, but I know that he spends a lot of time on the move so I decided to make this little cutie so he'd have full range of movement in his arms.

The pattern is a free Ravelry download, called the Lola Vest.  I'm going to rename it The Frankie, in honor of a former student of mine who wore a sweater vest every single day that I ever had him in class for 3 whole school years.  This was the first knitting project where I had to pick up stitches on edges.  I was very careful to make the stitches evenly spaced and I think it actually came out rather well.  It was an added challenge to make the V neck actually look like a V.  Mine doesn't totally look like the photo, but it did come out pretty cute! 

I tried it on Jonah today and it fits him pretty well right now, so I'm going to give it to him early, instead of waiting until Christmas! My next vest will be a cable knit one...since I was able to teach myself the cable stitch this weekend.

Tuesday, October 11, 2011

off the hook...

Things have been pretty busy over here! I have been making more and more of those owl hats and it seems that many of my old friends and some new friends too are putting in their orders!

One of my cousins ordered a hat to go with her little girl's first birthday theme, "One's a hoot!"  She wanted it in very bright colors and I was able to gather all of the yarn in Hot Pink, Hot Orange, Hot Blue and Black to make the hats match the costume perfectly. Since she "bought" the yarn, I made up 3 hats to use up all of her yarn.  Here's a photo of two of the hats I made:

one's a hoot, two's cuter!
 I posted this same photo on Facebook and the orders are pouring in!  I've made a total of ten owls now and have just gotten another order.  All of this positive feedback has got me thinking about starting to sell these little babies on Etsy! I've been tweaking the free original pattern to fit bigger heads.  My sister, Michelle is also sporting one of these cuties on the kindergarten playground where she works.

It might take a while to make up a few items to post for sale...in the mean time I'm thinking of store names.  So far, "Stitch a Roux" is in the lead.  The name comes from the fact that both of my grandmothers (Memere Leroux and Memere Trudeau) were cracker jack crocheters and Memere Leroux was also a fantastic knitter.  Memere Trudeau used to make this dessert treat called Scotcharoos for every single get together my family ever had.  I figured this name would honor both of my memeres.

Monday, October 3, 2011

more scrappy crafts...

I have been crafting up a storm lately. We've been doing some road trips, so I've been making all sorts of smallish items in the car while Asa drives.  I've also been trying to use up scraps of yarn that I have taking up space in the yarn basket. 
booties 

These little booties were made with leftover yarn from a baby blanket from last year.  I saw the pattern for these cuties on Ravelry and knew right away that I would be making them soon.  They were quite quick and are very cute. They don't require much yarn and many color combos are possible...and very likely! I still need to pick up some buttons to match the green or blue/purple yarn...once they have buttons, the tabs will cross over and fasten in a criss cross.


I made these little flowers on our road trip up to NH for a wedding. I didn't have anything to wear in my hair so I made two crochet hair clips on the way. They came out very cute, and I got many compliments on them.  Asa was kind enough to wear one and show off my handy work for everyone to see.
flower clipped husband
newborn frogs ~ tadpoles?
These two newborn froggy hats aren't made entirely with scraps; I bought the soft green yarn special for this hat. But, their eyes are made using some scrap yarn.  This is the first knit character hat pattern that I've worked and I'm happy with how it turned out.  Grace saw me making them and she is really hoping I make one that will fit her head.

Monday, September 26, 2011

knit kick...

Its not really a secret that I've been buying yarn, a lot of yarn, lately.  Those pesky craft stores have been putting all of their reduced yarn in bins at crazy cheap prices.  I picked up the last two skeins of this extra thick purple yarn that is marketed as "thick and quick."  This means that you use very big needles and in no time at all, you have a super warm finished product.
Since I only had two skeins of this heather purple yarn, I knew I had to come up with a smallish project. I didn't want to make a hat, since the yarn is so thick, it would make a hat much too warm, even for Boston in January!  Plus, I've been making a lot of hats lately. I decided to make something new and different (for me, anyway).
kicking back

thick stitches, slight ribbing

To make these leg warmers, I decided how wide I wanted them to be, cast on that many stitches, and then kept knitting until I got to the end.  I wanted to make sure they didn't roll, which would be uncomfortable with such thick yarn, so I did put a small band of ribbing on the bottoms and then a wider band once I got to the top.  Each legwarmer took exactly one skein of yarn and they go to just below my knee.  They are really stiff, so there won't be any slouching. I can see now that I could have used bigger knitting needles, but what's the point of $1.97 a skein yarn if I have to spend $10.00 on new needles? These little leg warmers really were quick.  It only took three hours of knitting to make the pair.

Sunday, September 25, 2011

cloudy skies...sun dress...

Despite the lack of sunny skies, I finished that little sundress I had posted about last week.  It might be the cutest little sundress that I ever did make (and the only one). I had found the free pattern while shopping for yarn a few weeks ago. I love how it came out. I love the bright colors (and not a pink among them). I love the little button. I love how it took exactly how much yarn it said it would!  It is supposed to fit 18 months-2 years...and that's not gonna happen, but I happen to know one or two little girls that it will fit!

pretty sundress
shells and loops

I plan to buy a little shirt and some leggings to go with it, so it can be a winter time gift!  I might use the little scraps of yarn left over to make some crochet flowers for hair clips too!

Tuesday, September 13, 2011

hoot hoot...

I recently became a member of Ravelry. I had heard some ladies in the craft section of a book store talking about it so I went online and checked it out. Its a site for knitters and crocheters to share projects that they have made or are working on. I like the site quite a lot and have found many adorable patterns (some of them even for free).  I tried this little owl out and I love so many things about it!

baby and big sister owl
The pattern is easy to do, quick to do, and so stinking cute! The posted free pattern for is for a newborn, but its a basic pattern that is pretty easy to adapt for larger sizes.  Once the basic cap, ears, eyes and beak are done, it goes together really easily and I can make one in only 2 hours. I've already made three of these little owls, with orders for a few more already! These two hoots are on the way to new baby Marley and big sister Maela!

scrappy crafty...

Last week I gave myself another little challenge. I wanted to finish three projects using scraps of yarn that I had in my overflowing the yarn basket.

Mission Accomplished!
Dragon Girl

Dragon in the cave
The piggie hat and wolf hat were a pig hit at work, so my first scrappy craft was a dragon hat.  I used some left over yarn from a previous project. I had made some crochet fruits and veggies for my little cousin, Maela's birthday last year. The green, light green, and orange were all from that project, as was the stuffing that I used to stuff the tail and scales.
 

I still had plenty of orange yarn left so I made this little pumpkin hat for my other little cousin, Kenzie.  I wasn't sure how many stitches to use when I knit this up for an eight month old.  But, at 80 stitches on a size 6 needle, it fit her perfectly! The hat came out really well, even though I'm not crazy for the yarn. I also dug out a tiny scrap of brown yarn for the stem. I had bought the orange yarn for a fruit toy project so its not really a soft yarn, its more sturdy...but it will do!

brand new baby booties
My last project was a pair of baby booties. When I bought the yarn for that snuggly wrap, there was a free pattern for baby booties hanging along side of the yarn.  It was written specifically for that type of yarn. I followed the pattern exactly, but these booties are really tiny...they will fit a newborn for about 1 week, I think...but they are super cute.  I still have a bit more yarn, so I plan to make a little hat to go along with them.

Thursday, September 8, 2011

what big eyes you have...

I couldn't wait to get this little hat finished!
wolf hat on the prowl

The babies are entering a dress up phase and they both loved wearing that piggie hat so much, they wanted needed another hat so they could both wear one at the same time. Grace has even been napping with one on! So, here is the wolf hat that is supposed to go along with the red riding hood, though it does go with the piggie hat too. We've been playing in the tent and pretending its one of the houses from The Three Little Pigs.  Jonah fancies himself as the Big Bad Wolf.
he's gonna huff and puff that tent down
 It came out much cuter than I thought it would and sewing the eyes, snout, tongue, and ears on wasn't as terrible as I thought it would be. Next I think I'll try a dragon to go with the pig hat for one of Grace's favorite books, Spiffen: tale of a tidy pig.

Monday, September 5, 2011

oink oink went the little pink pig

I've been excited to start AND finish two brand new projects this week. And I have plenty of yarn to start a couple of other projects that I've dreamed up...but I was starting to feel a bit guilty.  I still had 3 unfinished projects laying about the yarn basket. 
We had a nice breakfast at home today since Asa and I have the day off. I also managed to finally put that piggie hat together.  It came out pretty cute, but it was not a perfect project. Sewing the ears on straight and symmetrical took some trial and error.  I also stuffed them, so that provided a bit of extra work to sew them on with all the stuffing on the inside.  Trying to embroider eyes also took some trial and error.  I'm not that great at embroidery, keeping the correct tension is always a problem for me.  I ended up doing a modified knotting job sort of like candle wicking and they came out okay.  And then creating the snout and attaching it proved a bit weird.  I used a different yarn and stitch so its different. I also put a little stuffing in there to puff it out a bit.  These are all skills that I need to practice with...
pink piggie hat
Its not totally perfect, but it is pretty cute.  Both Grace and Jonah are entering that phase where they like to pretend so hopefully they will have fun playing dress up with this prototype piggie hat!

a blanket for baby leo

There have been a few new babies in the family lately.  Just before our wedding, baby Leo was born to my cousin Frank and his wife Kerry.  While I haven't met him yet, I wanted to be sure to meet him with a little something homemade and cuddly.  Since this summer has been so hot, there wasn't really a rush to get a baby blanket snuggled around him. But, now that it is going to be fall tomorrow...he'll be snuggled up on his walks with Mom and Dad.
blue and green for little red head Leo
I made this blanket pretty quickly this week. It went quickly because I used a heavier weight yarn and a bit bigger hook. Its also a small little thing, perfect for wrapping and covering him in his carrier and stroller without risking dragging it on the ground. This blanket is the same exact pattern at the multicolored blanket I finished two weeks ago. I hope Kerry and Frank, and especially Leo love this little blankie. He'll get to try it out today when Asa and I meet him at his grandmother's birthday party!

a little red riding hood

Hurricane Irene brought plenty of rain and wind to New England last weekend! Luckily for us Bostonians, there wasn't much damage for the storm. We didn't even lose power here in Roslindale. While we waited out the storm, I got started on a long awaited project... I had been dieing to start this new project but had made a promise to myself that I wouldn't start anything new until I finished a few of the projects laying around my yarn basket.    I had bought the yarn for this project for the bargain basement price of 97 cents a skein.  I wasn't sure how much I would need, but at that price, I wasn't afraid of buying a ton of it!  It turned out that I bought enough yarn to also make a hat or two this winter in addition to this completed red riding hood!
who's afraid of the big bad wolf?
I'm afraid that this picture doesn't do the cape justice. I plan to take a few hundred photos of Grace wearing the cape this week and again at Halloween time...so stay tuned!
little red hanging hood